
##Can I still use the Black and Tan Jaguars? The system should support either jag with the latest firmware.
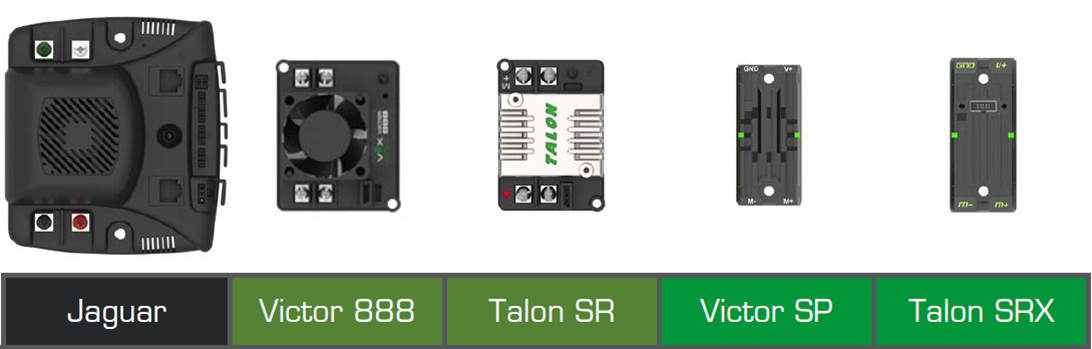
##I Accidently supplied power to the Motor Controller with reversed polarity, did I break it? Possibly. The Talon SRX, Victor SP Talon,Talon SR, Victor 884, Victor 888, Black Jaguar or Tan Jaguars models DO NOT have reverse polarity protection. It may not fail immediately, but can fail over time. One should always be cautious when wiring a motor controller, the labels for each terminal are clearly marked. Review all wiring before powering any motor controller to ensure that they are wired correctly, and that power is being supplied to the proper terminals, in the proper polarity.
###The New Talon SRX and Victor SP DO NOT have reverse polarity protection. Reversing the polaritys will damage the motor controllers.
##I Accidently supplied 12V power to the output side of the Motor Controller, did I break it? Possibly, supplying unregulated power to the output of the Talon SRX, Victor SP, Talon, Talon SR, Victor 884, Victor 888, Black Jaguar, or Tan Jaguar models may permenantly damage the H-bridge inside of the device. The device may not fail immediately, but can fail over time.
###The New Talon SRX and Victor SP DO NOT have H-bridge output protection. Supplying power to the output of the motor controllers will damamge them.
##Do Talons and Victors still have limited resolution compared to Jaguars? The overall PWM resolution has been increased (from ~8 bits to ~11) but Jaguars still, by default, use a wider input range than Victors or Talons and thus will have a finer resolution.
The cRIO through the NI 9403 has a resolution of 6.525 us between updates to the PWM signals.
The roboRIO has a resolution of 1 us between updates to the PWM signals. The only reason the “bits of resolution” went up was to make sure the whole range could still be covered at the new smaller period between updates.
##Do I need to set the internal jumper on the roboRIO to drive Servos? No. The 3.3V/5V internal jumper only affects the DIO channel power output. The PWM signals are always 5V max. The PWM power is always 6v output. The motor controllers have this line disconnected, so power on it doesn’t affect them. This means you can use the same PWM pins to power 6V servos, or FRC legal motor controllers without changing any hardware settings.
##I measured the 6V rail, and it is actually 5.7V. I am guessing the 6V signal will drop from 5.7 to below 5.0 when there is a load on the servo.
Fear not. This is an artifact of the back-drive protection on this supply. The current path passes through a diode when the load is low. When the current is detected to be greater than 0, a FET is switched on and the diode is bypassed. This means that at no load the output looks low (5.7V), but as soon as there is a load, the voltage climbs to 6V.
##Can I use the Talon SRX in PWM or CAN mode?
Yes, the Talon SRX will automatically detect whether it is connected to a PWM source or a CAN source.
PWM Signal = CANH (Yellow Wire) PWM Ground = CANL (Green Wire)
On our team we wire the CAN wires to the outside pins of 3 pin female headers (center pin empty). This allows us to use the Talon SRX in PWM mode or CAN mode. In PWM mode we simply plug it into the PWM port on the roboRIO (since the center pin is not used for any motor controller)
In CAN mode we use male header pin couplers to join two Talons together to form the CAN bus.
##How do we set the brake/coast mode on the new Victor SP or Talon SRX?
A single button is used to calibrate and set the brake/coast on both new motor controllers.
To switch between brake or coast mode, press the B/C CAL button. The button is illuminated red when the Victor SP or Talon SRX is in brake mode and off when in coast mode. This is a persistent setting, and is retained between power cycles of the motor controller.
To calibrate, hold the button until the status LEDS (LEDs on either side) begin to flash between red and green. While holding this button down, move the joysticks between full forward and full reverse multiple times. Release the joystick and allow it to center, then release the CAL button. If the calibration is successful, you should see the status LED blink green, if the calibration failed the status LED will blink red.
To restore to default calibration, with the controller unpowered, press and hold the CAL button, then supply power to the inputs of the motor controller until the status LED blinks green.
##How do we calibrate the new Victor SP or Talon SRX? Please see answer to question above.
##Can we set brake/coast mode through robot code? We used DIO pins in the past to change Talons from brake to coast on the fly?
The Victor SP does not support any “on the fly” selection of brake/coast. This will need to be set prior to a match.
The Talon SRX does support “on the fly” selection of brake/coast when using CAN. A CAN API call can be used to toggle brake/coast. However, if used in PWM mode there is no way for an “on the fly” selection of brake/coast mode in match.
##Can I power my sensor directly from the Talon SRX interface port? Yes. The Talon SRX provides both 5V and 3.3V sources to power any encoder or limit switch you make wish to add to it.