
THIS IS A DRAFT VERSION, NO SECTION IS FINAL
Last Updated: Dec. 11 2014
1.0 Introduction:
In this article Team 2168 compares the performance of 3 popular embedded processors used in Vision Processing for their use in the First Robotics Competition (FRC).
The purpose of this test is to help determine which device is best suitable to a team depending on their needs.
1.1 Background information
In this study we wish to understand the performance differences between different embedded devices and determine if there is a clear advantage in using one over the next for FRC. We will be studying the total time it takes to process images on each target.
In general the time to process a frame is comprised of:
We can use the total time to process a frame to determine how many frames per second we can process on each device without missing frames.
Now a word of caution, the above is kind of a best case scenario for estimating processing time. It doesn’t account for any overhead. Overhead is any other external process which takes away CPU time from your processing thread, thus increasing processing time.
For example: - Other Operating system services - Servicing other program threads - Waiting for another thread to release a mutex lock - Other programs running on the device - etc.
To truely get an accurate account of performance, these overhead processing times will need to be accounted for as well. All of the above will increase your effective processing time and reduce acutal FPS your device can process.
1.1.1 Processing Lag
When processing a streaming video, you must read every frame to get to the next. Lag occurs when you are no longer processing the latest image, but instead an intermediate frame. This occurs when your processing time takes longer then the time delta between frames.
For example: Let’s assume that your camera is configured to produce images at a rate of 10 frames per second. That means that every 100ms a new image will be generated.
If the time to download the image and process it is less than 100ms, then you will be processing images in real-time without any lag. This means you are always processing the latest image generated by the camera. However, if it takes more than 100ms to process a frame, such that new frames are generated while you are still processing the old one, then you will experience lag. The goal is to ensure that our processing loop executed before the next frame is generated.
However, lagging 1 or 2 frames behind the real time image is probably un-noticable for any FRC application. The danger is that you want to make sure any lag occurs infrequently, and doesn’t compound itself. A compound situation is when every loop iteration, you take 1 or more frames to process the current frame. This means that as you are processing the current frame, one or more new frames are generated. This inturn causes all new frames to be buffered. Eventually, after enough time has passed, you could be processing a frame that is multiple seconds behind real-time, and that is a problem. The solution here is to turn down the frame rate of your camera to allow the processing thread to catch up.
1.2 Test Objectives:
In this test we will be focusing on 3 test scenarios:
A. Beagle Bone Black - Off Board Processor B. Nvidia Jetson TK1 - Off Board Processor C. Vision on Roborio along side Robot Code
The reason we are focusing on these 3 devices is two fold:
- These are the current embedded devices we have on hand
- These devices all share a similar ARM Cortex processor
The tests herein will be conducted using the same source code, library versions, and camera settings. The purpose is to have an apples-to-apples comparison of the same source code’s performance on each target device.
For each scenario there will be two subsets of test:
- Baseline performance test
- Used to capture the worst-case scenario processing time and image downloading time achievable on the target.
- Goal is to isolate the processing thread and frame capture thread to calculate times individually.
- Live performance test
- The images to be processes will be captured live from a connected IP camera so as to mimic a real FRC match. At no point will previously saved images or local files be used (we want image download time to be factored in as well).
- Goal is to observe algorithm time and achievable FPS under similar conditions of a real FRC match.
Each test will be using the Axis M1011 Ethernet Camera. Most of the camera settings will remain fixed through each test, however certain parameters we will vary and apply those settings to each target so as to find the optimal and maximum FPS, and image quality settings which maximize performance on each embedded device. The camera settings used in these tests are outlined in section 2.4.
These tests are CPU based only. GPUs are not used on any device for any processing capabilities. Additional tests will be performed at a later time to test GPU capability. At the time of this writing only the GPU in the Tegra is supported by OpenCV, so that is the only embedded device which would benefit from GPU accelerated vision processing.
##2.0 Meet the hardware:
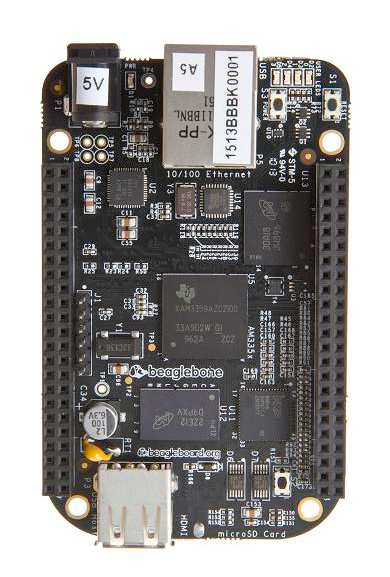
2.1 Beagle Bone Black
 |
|
2.2 Jetson TK1
 |
|
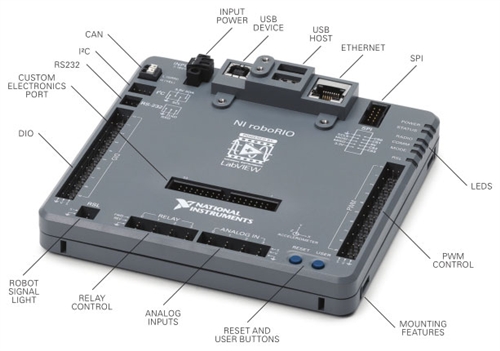
2.3 RoboRio
 |
|
2.4 Axis M1011 IP Camera
Camera Settings: Camera: Axis M1011 Ethernet Camera Compression: 30 Constant Bit Rate: Variable Color Level: 100 out of 100 Brightness: 25 out of 100 Sharpness: 100 out of 100 Contrast: 100 out of 100 WhiteBalance: Fixed Indoor Exposure: 23 out of 100 Exposure control: Hold Current
The only items we varied are:
- Frame Size:
- 320 x 240
- 640 x 480
- Frames Per Second
- 10 fps
- 20 fps
- unlimited (30FPS max rate)
3.0 Test Apparatus:
3.1 Scenario A Test Apparatus:
- BeagleBone Black, RoboRio, and M1011 Camera are connected via hardware Ethernet using D-Link 1522 Rev B switch.
- M1011 Camera and D-Link are powered from 2015 Voltage Regulator Module
- VRM and RoboRio are powered from 2015 Power Distribution Panel
- PDP is powered by FRC Legal Battery
- BeagleBone Black is powered from 5v2A supply connected to 110V wall outlet
- BeagleBone Black IP: 10.21.68.33
- RoboRio IP: 10.21.68.2
- M1011 IP: 10.21.68.90
- Development Computer: 10.21.68.101
- No other devices on networks
3.2 Scenario B Test Apparatus:
- Jetson TK1, RoboRio, and M1011 Camera are connected via hardware Ethernet using D-Link 1522 Rev B switch.
- M1011 Camera and D-Link are powered from 2015 Voltage Regulator Module
- VRM and RoboRio are powered from 2015 Power Distribution Panel
- PDP is powered by FRC Legal Battery
- Jetson TK1 is powered from 12v5A external supply connected to 110V wall outlet
- Jetson TK1 IP: 10.21.68.71
- RoboRio IP: 10.21.68.2
- M1011 IP: 10.21.68.90
- Development Computer: 10.21.68.101
- No other devices on network
3.3 Scenario C Test Apparatus:
- RoboRio, and M1011 Camera are connected via hardware Ethernet using D-Link 1522 Rev B switch.
- M1011 Camera and D-Link are powered from 2015 Voltage Regulator Module
- VRM and RoboRio are powered from 2015 Power Distribution Panel
- PDP is powered by FRC Legal Battery
- RoboRio IP: 10.21.68.2
- M1011 IP: 10.21.68.90
- Development Computer: 10.21.68.101
- No other devices on network
3.4 Measurement Accuracy:
The performance measurements will be done internally in the code Using C++ RT library clock on each device:
Here is an example of how the measurements are taken within the code.
#include <ctime>

clock_gettime(CLOCK_REALTIME, &start);
   //some process to measure
clock_gettime(CLOCK_REALTIME, &end);
cout << diffClock(start, end) <<endl;

//Where diffClock is defined as
double diffClock(timespec start, timespec end)
{
  return (end.tv_sec - start.tv_sec) + (double) (end.tv_nsec - start.tv_nsec)/1000000000.0f;
}
4.0 Source Code Description:
The vision code used is the exact source code we ran throughout 5 competition in the 2014 season on a Beaglebone white. The source has undergone no changes for these test other than adding/modifying code to time the areas of interest.
The code has 4 threads:
- 1st: Outgoing TCP Messages to RoboRio
- 2nd: Incoming TCP Messages to RoboRio
- 3rd: FFMPEG Video Capture of Camera
- 4th: Image processing thread
The program is written using pthreads and pthread mutex locks for thread safe operation. Upon startup the Outgoing TCP link and FFMPEG threads start and try to establish communication with the RoboRio and the IP camera respectively.
Once communication with the RoboRio is established, the Incoming TCP message thread starts, if there is no communication with the RoboRio the outgoing thread will retry once a second, until communications are established.
In parallel, the FFMPEG thread is trying to establish a link with the IP Camera. IF no link is established the thread will retry at a rate of five times a second.
Once a connection to the IP camera is established, the thread reads and flushes all images for 12 seconds. This means the thread just grabs the frame and throws it away. This is to ensure that there is no buffered/old images stored in the camera’s network buffer during camera startup. (Which we noticed was happening on camera startup during previous tests).
After the 12 second flush, the Imagine processing thread will start and the FFMPEG thread will capture each frame and store it in a thread safe global variable. Each loop iteration, the FFMPEG overwrites the previous frame captured.
The memory location where the frame is stored is global shared memory. Write access is granted to the FFMPEG thread and read access is grated to the processing thread.
A mutually exclusive (mutex) pthread lock is used to ensure that at no time does a read and write operation occur simultaneously. However, this means that either processing thread or FFMPEG thread can cause the other thread to wait momentarily for the read or write operation to finish.
Because of this mutex lock, processing time per frame is dependent upon the coupling between these two threads.
Each processing loop, the processing thread will grab the latest FFMPEG frame and perform the following OPENCV operations:
- InRange Threshold
- Blur filter
- findContors
- Box all Contours
- Determine Size ratio and position of all contours (for Hot target detection)
After which the processing of the image is done, and a few global thread safe variables are updated based on what the image processing determine, and those values are then sent over the outgoing TCP message to the RoboRio.
This cycle continues forever as long as communication with the IP camera and RoboRio are maintained, all while FFMPEG continues to grab the latest frame from the camera in parallel.
The processing thread and FFMPEG thread each have a 1ms sleep before the next iteration starts. This allows the CPU to service any other waiting threads.
4.1 Generic Code Optimizations:
- The code is compiled with GCC 4.6.3 with -o3 optimizations enabled
- NEON mfpu for floating point is enabled for all targets
- Specific target optimizations are not enabled
- All output is written to a file vs cout (file output is much faster)
- \n is used instead of endl (to avoid flushing the buffer each time)
RoboRio and BeagleBone black are compiled with gcc 4.6.3 with softFP floating point operations, -03 code optimization, and NEON SIMD support
Jetson TK1 vision code is compiled with gcc 4.6.3 with hardFP floating point operations, -03 code optimizations, and NEON SIMD support
In all instances the CPU of the device was manually set to the highest clock-rate so performance would not be diminished by “on demand” CPU throttling built into the linux OS.
Also X11 forwarding has been enabled and a view window outputting the processed image is displayed on the Development computer
5.0 Results
5.1 Scenario A Tests (BeagleBone):
### IN PROGRESS
5.2 Scenario B Tests (Jetson TK1):
5.2.1 Tegra Baseline Tests
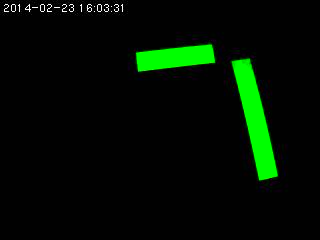
5.2.1.1 320x240 Baseline Processing
On the Tegra we executed the Vision code while reading an image from the file. The image was a snapshot taken from the Axis camera of our 2014 vision target. The purpose of this test was to calculate the fastest rate we could process images without worrying about downloading first. The image is loaded into memory only once. We ran the test for both 320 x 240 images and 640x480 images.
current CPU frequency is 2.32 GHz and all 4 cores are online
Below is the sample image we used for the test.
We ran the test for two cases:
- With X11 forwarding enabled
- Without X11 forwarding enabled
The reason we did this was because, during our testing last year, we used X11 forwarding to view the image output while debugging/testing our algorithm, and it was notably slower than with X11 off. In a match, we do not use X11 forwarding.
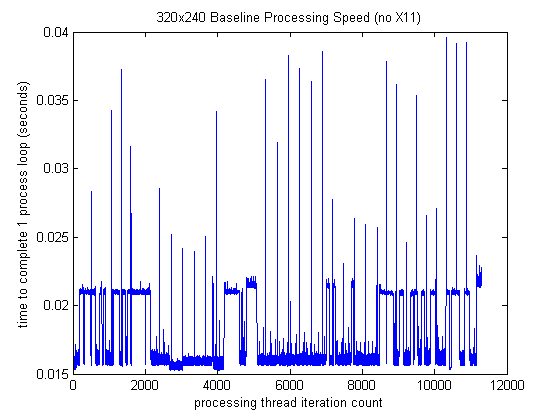
Below is a plot of how long each processing loop took to execute without X11 (blue) and with X11 (red).
.png)
.png)
We can see that our processing time per frame on the Tegra took about 2.45ms nominally, and was about 3.4ms in the worst case. We also notice that when X11 is activated, our nominal processing time increases to about 4ms and peaks around 5ms in the worst case.
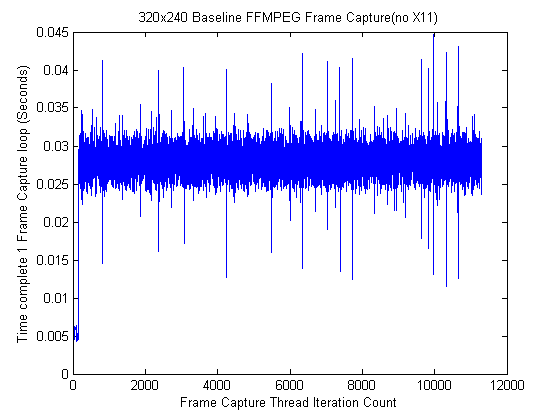
We then disable the processing thread, and enable the FFMPEG image capture thread. This test captures live images from the Axis camera as quickly as possible. The framerate on the camera is set to unlimited, which means it will serve pictures at 30 fps. This test will show how long it takes our software to download and store into memory a single frame. Again we run the tests with X11 (blue) and without X11 (red) forwarding on.
.png)
.png)
Before we break down the analysis of the charts above, we must note that we are using the VideoCapture C++ object from openCV to set up the FFMPEG stream. More importantly, when ever we try to grab a frame, the function will block the FFMPEG thread execution until a new frame is ready. Then it will download it, and then convert it to a 2D Matrix.
When the camera serves images at 30 frames per second that means a new image is available every:
Using that information, we expect the time between frames to be at most 33 milliseconds, this is when the FFMPEG capture thread is sleeping waiting for the next frame to be available. We must be cautions to not include this wait in our FPS calculations, because it is a limitation set by the camera max frame rate of our test environment, not of the embedded device we are using.
Any time above this 33ms threshold is truly processing time spent on downloading and converting the image within our code.
We can see from the plot, that it takes a nominal time of about 34ms, and worst case of 45ms to download a frame, and load it into memory. This means that for the case where the capture time is around 34ms, downloading the frame and storing it into memory is of little contribution to processing time, all of the time is spent waiting on the next frame. In the case where we hit the peak numbers, the above plot shows in the worst case it took about 10-12ms to decode and store the image. Based on this data we can conclude that downloading and storing an image only contributes anywhere between 0-12ms to our processing time. When comparing the charts it doesn’t appear that X11 forwarding affects the outcome. This makes sense because X11 forwarding should only be active when the process thread is running (serving our output image). So this is what we should expect.
Just based on these numbers, we can calculate a target FPS we can successfully process with the system we have set up, without experiencing lag. We choose to use the worst case numbers instead of nominal numbers to show the very minimum FPS we can gurantee under these consitions. In addition, these logs were captured individually and don’t account for any overhead processing time. So we want to be conservative. The next section shows total execution time for the complete application.
For the Worst Processing Case:
We convert this number to Frames per second:
This shows that under these conditions we can successfully process our 320x240 images at 65fps on the Tegra, under the worst case scenarios. Our nominal case (as in actual performance should be much better). In section 5.2.2 we look at actual performance of this code on the Tegra. This quick study shows we can at least guarantee the ability to run this vision code at 65 frames per second without lag on the Tegra in the worst case.
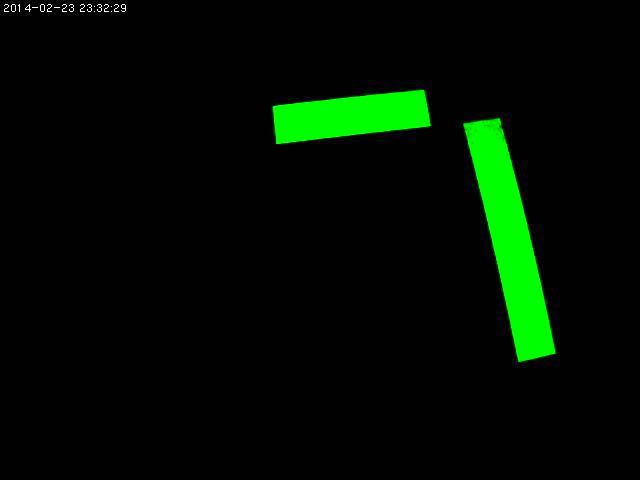
5.2.1.2 640x480 Baseline processing
We ran the same test as above, but with a 640x480 image captured from the Axis. Below is the sample image we used for the test.
Just as before We ran the test for two cases:
- With X11 forwarding enabled
- Without X11 forwarding enabled
Below is a plot of how long each processing loop took to execute without X11 (blue) and with X11 (red).
.png)
.png)
We can see that our processing time per frame on the Tegra took about 10.3ms nominally, and was under 10.2ms in the worst case. We also notice that when X11 is activated, our nominal processing time increases to about 11ms and peaks around 18ms in the worst case.
We then disable the processing thread, and enable the FFMPEG image capture thread. This test captures live images from the Axis camera as quickly as possible. The framerate on the camera is set to unlimited, which means it will serve pictures at 30 fps. This test will show how long it takes our software to download and store into memory a single frame. Again we run the tests with X11 (blue) and without X11 (red) forwarding on.
The same conditions as above applies with regards to the camera framerate. It take roughly 33ms seconds for the camera to serve a new picture, and because the thread waits for the new picture we can safely disregard any time under 33ms counting toward processing time.
.png)
.png)
We can see from the plot, that it takes a nominal time of about 34ms, and worst case of 45ms to download a frame, and load it into memory. This means that for the case where the capture time is around 34ms, downloading the frame and storing it into memory is of little contribution to processing time, all of the time is spent waiting on the next frame. In the case where we hit the peak numbers, that means in the worst case it took about 10-12ms to decode and store the image. Based on this data we can conclude that downloading and storing an image only contributes anywhere between 0-12ms to our processing time. When comparing the charts it doesn’t appear that X11 forwarding affect the outcome. This makes sense because X11 forwarding should only be active when the process thread is running (serving our output image). So this is what we should expect.
The 640x480 has 4 times the pixel density of the 320x240 image. So it makes sense that the processing time is roughly 4 times larger for the 640x480 when compared to the 320x240 baseline test.
Just based on these numbers, we can calculate a target FPS we can successfully process with the system we have set up, without experiencing lag. In addition, these logs were captured individually and don’t account for any overhead processing time. So we want to be conservative. The next section shows total execution time for the complete application.
For the Worst Processing Case:
We convert this number to Frames per second:
This shows that under these conditions we can successfully process our 640x480 images at 45fps on the Tegra, under the worst case scenarios. Our nominal case (as in actual performance should be much better). In section 5.2.2 we look at actual performance of this code on the Tegra. This quick study shows we can at least guarantee the ability to run this vision code at 45 frames per second without lag on the Tegra in the worst case.
5.2.2 Tegra Live Performance
In this section, we run the vision code, with all threads active and time the entire process each iteration. This gives us a true understanding of the actual performance of the code under real FRC match conditions. This test was ran for 160s exactly in all cases.
5.2.2.1 320x240 Live Tegra performance 30 fps
We run the algorithm for 160s with the camera set to unlimited frames per second. The max output of the camera used is 30 fps.
Just as before We ran the test for two cases:
- With X11 forwarding enabled
- Without X11 forwarding enabled
Below is a plot of how long each processing loop took to execute without X11 (blue) and with X11 (red).
.png)
.png)
Note: the above timing chart takes into account the time it take to wait for a frame, download it, convert, it and process it.
We can see from the chart that a majority of the time, the tegra is waiting for new frames. When it does get a frame it processes it within about 1-5ms. We also observe that this processing is done in real-time and at no point does the process image lag the real time image.
Based on the above data, we can conclude that under the conditions of this test, the Tegra TK1 is fully capable of real-time processing using the Axis camera with max FPS set (30 fps) at 320x240 using the CPU alone, and has a lot of compute power left to do more.
5.2.2.2 320x240 Live Tegra performance 20 fps
Because we have shown above that the Tegra can perform at 30+ fps, we chose to ignore testing it a lower FPS camera setting.
5.2.2.3 320x240 Live Tegra performance 10 fps
Because we have shown above that the Tegra can perform at 30+ fps, we chose to ignore testing it a lower FPS camera setting.
5.2.2.4 640x480 Live Tegra performance 30 fps
We run the algorithm for 160s with the camera set to unlimited frames per second. The max output of the camera used is 30 fps.
Just as before We ran the test for two cases:
- With X11 forwarding enabled
- Without X11 forwarding enabled
Below is a plot of how long each processing loop took to execute without X11 (blue) and with X11 (red).
.png)
.png)
Note: the above timing chart takes into account the time it take to wait for a frame, download it, convert, it and process it.
We can see from the chart that a majority of the time, the tegra is waiting for new frames and processing stays around 11ms. A couple of times the processing peaked to about 45ms, but since it didn’t peak over 2x time frame rate (66ms), we never saw any lag. We also notice that immediately after the peak, once the frame is aquired it is processes within about 1-5ms typically. The plot indicates this processing is done in real-time and at no point does the process image lag the real time image.
We are still trying to detrermine exactly why the processing time was so low (around 1ms vs around 33ms). We believe this was because the FFMPEG thread started at a point right before the camera was ready to produce new images, thus instead of waiting the full 33ms every loop iteration, less time was required to wait for the next frame.
Based on the above data, we can conclude that under the conditions of this test, the Tegra TK1 is fully capable of real-time processing using the Axis camera with max FPS set (30 fps) at 640x480 using the CPU alone, and has a lot of compute power left to do more.
5.2.2.5 640x480 Live Tegra performance 20 fps
Because we have shown above that the Tegra can perform at 30+ fps, we chose to ignore testing it a lower FPS camera setting.
5.2.2.6 640x480 Live Tegra performance 10 fps
Because we have shown above that the Tegra can perform at 30+ fps, we chose to ignore testing it a lower FPS camera setting.
## 5.3.3 Tegra Performance Summary
5.3 Scenario C Tests (RoboRio)
5.3.1 Baseline Tests
On the RoboRio we executed the Vision code while reading an image from the file. The image was a snapshot taken from the Axis camera of our vision target. The purpose of this test was to calculate the fastest rate we could process images without worrying about downloading first. The image is loaded into memory only once. We ran the test for both 320 x 240 images and 640x480 images.
Further testing needs to be done to ensure we are infact using both cores on the RoboRio when running these Tests. Also note, that the default Java code was running with an established DS connection, but the robot was not being actively driven.
5.3.1.1 320 x 240 Baseline processing
Below is the sample image we used for the test.
We ran the test for two cases:
- With X11 forwarding enabled
- Without X11 forwarding enabled
The reason we did this was because, during our testing last year, we used X11 forwarding to view the image output while debugging/testing our algorithm, and it was notably slower than with X11 off. In a match, we do not use X11 forwarding.
Below is a plot of how long each processing loop took to execute without X11 (blue) and with X11 (red).

We can see that our processing time per frame on the Roborio took about 21ms nominally, and was under 40ms in the worst case. We also notice that when X11 is activated, our nominal processing time increases to about 29ms and peaks around 50ms in the worst case.
We then disable the processing thread, and enable the FFMPEG image capture thread. This test captures live images from the Axis camera as quickly as possible. The framerate on the camera is set to unlimited, which means it will serve pictures at 30 fps. This test will show how long it takes our software to download and store into memory a single frame. Again we run the tests with X11 (blue) and without X11 (red) forwarding on.

Before we break down the analysis of the charts above, we must note that we are using the VideoCapture C++ object from openCV to set up the FFMPEG stream. More importantly, when ever we try to grab a frame, the function will block the FFMPEG thread execution until a new frame is ready. Then it will download it, and then convert it to a 2D Matrix.
When the camera serves images at 30 frames per second that means a new image is available every:
Using that information, we expect the time between frames to be at most 33 milliseconds, this is when the FFMPEG capture thread is sleeping waiting for the next frame to be available. We must be cautions to not include this wait in our FPS calculations, because it is a limitation set by the camera max frame rate of our test environment, not of the embedded device we are using.
Any time above this 33ms threshold is truly processing time spent on downloading and converting the image within our code.
We can see from the plot, that it takes a nominal time of about 34ms, and worst case of 45ms to download a frame, and load it into memory. This means that for the case where the capture time is around 34ms, downloading the frame and storing it into memory is of little contribution to processing time, all of the time is spent waiting on the next frame. In the case where we hit the peak numbers, the above plot shows in the worst case it took about 10-12ms to decode and store the image. Based on this data we can conclude that downloading and storing an image only contributes anywhere between 0-12ms to our processing time. When comparing the charts it doesn’t appear that X11 forwarding affects the outcome. This makes sense because X11 forwarding should only be active when the process thread is running (serving our output image). So this is what we should expect.
Just based on these numbers, we can calculate a target FPS we can successfully process with the system we have set up, without experiencing lag. We choose to use the worst case numbers instead of nominal numbers to show the very minimum FPS we can gurantee under these consitions. In addition, these logs were captured individually and don’t account for any overhead processing time. So we want to be conservative. The next section shows total execution time for the complete application.
For the Worst Processing Case:
We convert this number to Frames per second:
This shows that under these conditions we can successfully process our 320x240 images at 19fps on the RoboRio, under the worst case scenarios. Our nominal case (as in actual performance should be much better). In section 5.3.2 we look at actual performance of this code on the RoboRio. This quick study shows is that we can at least guarantee the ability to run this vision code at 19 frames per second without lag on the RoboRio in the worst case.
5.3.1.2 640x480 Baseline processing
We ran the same test as above, but with a 640x480 image captured from the Axis. Below is the sample image we used for the test.
Just as before We ran the test for two cases:
- With X11 forwarding enabled
- Without X11 forwarding enabled
Below is a plot of how long each processing loop took to execute without X11 (blue) and with X11 (red).
.png)
.png)
We can see that our processing time per frame on the Roborio took about 89ms nominally, and was under 111ms in the worst case. We also notice that when X11 is activated, our nominal processing time increases to about 140ms and peaks around 170ms in the worst case.
The 640x480 has 4 times the pixel density of the 320x240 image. So it makes sense that the processing time is roughly 4 times larger for the 640x480 when compared to the 320x240 baseline test.
We then disable the processing thread, and enable the FFMPEG image capture thread. This test captures live images from the Axis camera as quickly as possible. The framerate on the camera is set to unlimited, which means it will serve pictures at 30 fps. This test will show how long it takes our software to download and store into memory a single frame.
The same conditions as above applies with regards to the camera framerate. It take roughly 33ms seconds for the camera to serve a new picture, and because the thread waits for the new picture we can safely disregard any time under 33ms counting toward processing time.
Again we run the tests with X11 (blue) and without X11 (red) forwarding on.
.png)
.png)
We can see from the plot, that it takes a nominal time of about 33ms, and worst case of 53ms to download a frame, and load it into memory. Nominally the downloading and decoding of the frame doesn’t add to our processing time, however in the worst case we can see that it can take up to 23ms to download and convert the frame. When comparing the charts it doesn’t appear that X11 forwarding affect the outcome. This makes sense because X11 forwarding should only be active when the process thread is running (serving our output image). So this is what we should expect.
Just based on these numbers, we can estimate a target FPS we can successfully process with the system we have set up, without experiencing lag. In this case we choose to use the worst case numbers because if we use the nominal numbers, when ever our processing thread, or FFMPEG thread hits a peak in execution time, our framerate will fall behind and this will introduce lag. In addition, these logs were captured individually and don’t account for any overhead processing time. So we want to be conservative. The next section shows total execution time for the complete application.
We convert this number to Frames per second:
This shows that under these conditions we can successfully process our 640x480 images at about 9fps on the RoboRio under the worst case assumptions. Our nominal case, (as in actual performance should be much better). In section 5.3.2 we look at actual performance of this code on the RoboRio.
5.3.2 RoboRio Live Performance
In this section, we run the vision code, with all threads active and time the entire process each iteration. This gives us a true understanding of the actual performance of the code under real FRC match conditions. This test was ran for 160s exactly.
5.3.2.1 320x240 RoboRio Live performance 30 fps
We run the algorithm for 160s with the camera set to unlimited frames per second. The max output of the camera used is 30 fps.
Just as before We ran the test for two cases:
- With X11 forwarding enabled
- Without X11 forwarding enabled
Below is a plot of how long each processing loop took to execute without X11 (blue) and with X11 (red).
.png)
.png)
Note: the above timing chart takes into account the time it take to wait for a frame, download it, convert, it and process it.
We can see from the chart that a each loop (capturing a frame and storing it, and processing it for hot targets) completes within about 40ms. There are very few peaks with the highest occuring at around 60ms. Since the total loop iteration is less than the time it takes for 2 frames to be generated (66ms) we can conclude that this processing is done in real-time.
Based on the above data, we can conclude that under the conditions of this test, the RoboRio is fully capable of real-time processing using the Axis camera with max FPS set (30 fps) at 320x240 using the CPU alone, but only has marginal computational power left.
5.3.2.2 320x240 RoboRio Live performance 20 fps
We run the algorithm for 160s with the camera set to 20 frames per second.
Just as before We ran the test for two cases:
- With X11 forwarding enabled
- Without X11 forwarding enabled
When the camera serves images at 30 frames per second that means a new image is available every:
Using that information, we expect the time between frames to be at most 50 milliseconds
Below is a plot of how long each processing loop took to execute without X11 (blue) and with X11 (red).
.png)
.png)
Note: the above timing chart takes into account the time it take to wait for a frame, download it, convert, it and process it.
We can see from the chart that a each loop (capturing a frame and storing it, and processing it for hot targets) completes within about 70ms. But there are frequent processing peaks over 100ms. This indicates that during this run, we may have been lagging the real-time target by 1-2 frames.
It is unclear why this test indicates lag, but the previous test at 30FPS does not. Further testing, and video evidence will need to be taken in order to confirm wheter or not the RoboRio can sustain 30FPS under these conditions.
5.3.2.3 320x240 RoboRio Live performance 10 fps
We run the algorithm for 160s with the camera set to 10 frames per second.
Just as before We ran the test for two cases:
- With X11 forwarding enabled
- Without X11 forwarding enabled
When the camera serves images at 30 frames per second that means a new image is available every:
Using that information, we expect the time between frames to be at most 50 milliseconds
Below is a plot of how long each processing loop took to execute without X11 (blue) and with X11 (red).
.png)
.png)
Note: the above timing chart takes into account the time it take to wait for a frame, download it, convert, it and process it.
We can see from the chart that a each loop (capturing a frame and storing it, and processing it for hot targets) completes within about 100ms. There are frequent peaks with the highest occuring at around 180ms. Since the total loop iteration is less than the time it takes for 2 frames to be generated (200ms) we can conclude that this processing is done in real-time, or near real-time with at most 1 frame lag.
Based on the above data, we can conclude that under the conditions of this test, the RoboRio is fully capable of near real-time processing using the Axis camera with max FPS set (10 fps) at 320x240 using the CPU alone, but only has marginal computational power left.
5.3.2.4 640x480 RoboRio Live performance 30 fps
We run the algorithm for 160s with the camera set to unlimited frames per second. The max output of the camera used is 30 fps.
Just as before We ran the test for two cases:
- With X11 forwarding enabled
- Without X11 forwarding enabled
Below is a plot of how long each processing loop took to execute without X11 (blue) and with X11 (red).
.png)
.png)
Note: the above timing chart takes into account the time it take to wait for a frame, download it, convert, it and process it.
We can see from the chart that a each loop (capturing a frame and storing it, and processing it for hot targets) completes within about 100ms. There are frequent peaks with the highest occuring at around 165ms. Since the total loop iteration is more than the time it takes for 2 frames to be generated (66ms) we can conclude that this processing is done while experiencing an untolerable amount of lag.
Based on the above data, we can conclude that under the conditions of this test, the RoboRio is not capable of processing 640x480 images at 30fps without experiencing lag.
5.3.2.5 640x480 RoboRio Live performance 20 fps
We run the algorithm for 160s with the camera set to 20 frames per second.
Just as before We ran the test for two cases:
- With X11 forwarding enabled
- Without X11 forwarding enabled
When the camera serves images at 30 frames per second that means a new image is available every:
Using that information, we expect the time between frames to be at most 50 milliseconds
Below is a plot of how long each processing loop took to execute without X11 (blue) and with X11 (red).
.png)
.png)
Note: the above timing chart takes into account the time it take to wait for a frame, download it, convert, it and process it.
We can see from the chart that a each loop (capturing a frame and storing it, and processing it for hot targets) completes within about 110ms. There are frequent peaks with the highest occuring at around 185ms. Since the total loop iteration is more than the time it takes for 2 frames to be generated (100ms) we can conclude that this processing is done while experiencing an untolerable amount of lag.
Based on the above data, we can conclude that under the conditions of this test, the RoboRio is not capable of processing 640x480 images at 20fps without experiencing lag.
5.3.2.6 640x480 RoboRio Live performance 10 fps
We run the algorithm for 160s with the camera set to 10 frames per second.
Just as before We ran the test for two cases:
- With X11 forwarding enabled
- Without X11 forwarding enabled
When the camera serves images at 30 frames per second that means a new image is available every:
Using that information, we expect the time between frames to be at most 50 milliseconds
Below is a plot of how long each processing loop took to execute without X11 (blue) and with X11 (red).
.png)
.png)
Note: the above timing chart takes into account the time it take to wait for a frame, download it, convert, it and process it.
We can see from the chart that a each loop (capturing a frame and storing it, and processing it for hot targets) completes within about 150ms. There are frequent peaks with the highest occuring at around 223ms. Since the total loop iteration is more than the time it takes for 2 frames to be generated (200ms) we can conclude that this processing is done while experiencing an untolerable amount of lag.
Based on the above data, we can conclude that under the conditions of this test, the RoboRio is not capable of processing 640x480 images at 10fps without experiencing lag.
6.0 Results/Conclusions
Final conclusions and remarks will be posted once the BeagleBone data is posted.
Additional testing on the live performance of the RoboRio needs to be performed and documented. However, we can conclude at the moment that the RoboRio is not capable of processing 640x480 images at 10fps or greater under our test conditions without experiencing lag. We are in the process of cunducting additional test to determine what is the opimal framerate the RoboRio can process. Our baseline worst case was around 8.85fps. So that is our target.
Due to inconsistancies with the 320x240 data results, we are going back over that data to ensure accuracy and provide additional details for the RoboRio’s capabilities at processing 320x240 images.
Tegra TK1 is fully capable of processing 320x240 and 640x480 images at over 30fps using CPU alone, with a lot of computational power remaining.